17 May 2015

Create First Android App in Android Studio

You must have installed Android Studio by following the steps from the previous post. Now its time to create our First Application i.e. displaying "Hello World".

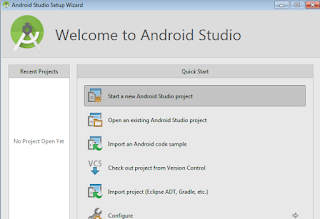
Step 1 : Open Android Studio. Select Theme.
open android studio

Step 2 : Click Next and the SDK Tools will be downloaded.
sdk download
Step 3 : Click Next. Select New Android Project.
create project

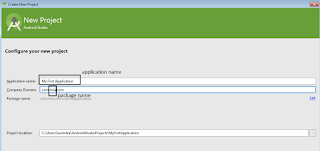
Step 4 : Give name and package name to your application. Click Next.
app name

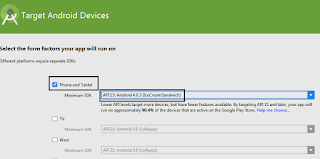
Step 5 : Select Phone and Tablet and choose minimum support version of android for your application.Click Next.
select phone

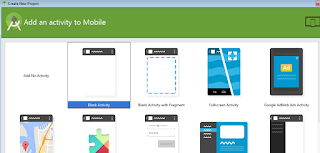
Step 6 : Select Blank Activity. Click Next
blankactivity

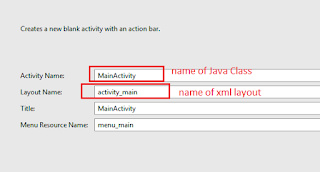
Step 7 : Select Name of your Activity and click Finish.
activity name

Step 8 : If the creating application window occurs again. hen Click Create New Android Application, it will directly create the same application , no need to worry.
gradle

Step 9 : The window is opened. Click on 1:Project on the left side toolbar. The app structure will be shown in Project Explorer.Now it is same as ADT with Eclipse.The activity_main will be opened followed by MainActivity.java
mainactivty java

Step 10 : Run the Project by clicking arrow above. Select the emulator device and Run It.
android device
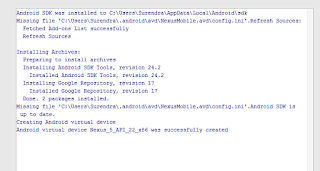
At first App won't run since you did not install the drivers required to run the emulator.
To install the drivers click here.

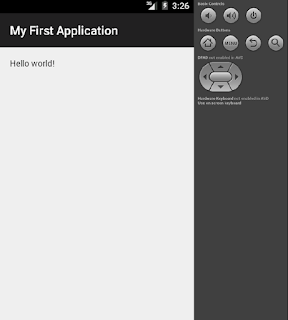
Step 11 : Emulator will be started and Hello World will be displayed.
emulator start

Stay Tuned with Made In Android

Published By:
Yatin Kode
on 17.5.15

14 May 2015

Emulator not started in Android Studio

As you installed the Android Studio and started making your first app, you may have realized that the emulator won't start. This is because of lack of some libraries or drivers.
The solution to this problem is.

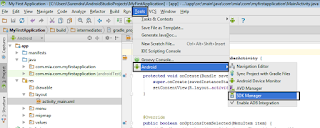
Step 1 : Open the Android SDK manager. Click on Tools->Android->SDK Manager from the menu bar.
android studio

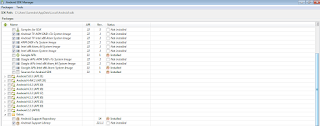
Step 2 : Select the packages as shown in the image below. All the packages are not shown in the image below.
packages downloaded
The packages to be chosen are:
  • Android TV ARM EABI v7a System Image (Important)
  • Android TV Intel x86 Atom System Image (Important)
  • ARM EABI v7a System Image (Important)
  • Intel x86 Atom_64 System Image (Important)
  • Intel x86 Atom System Image (Important)
  • Android Support Library (Important)
  • Intel x86 Emulator Accelerator HAXM (Important)
  • Google USB Driver Revision 11 (Optional)
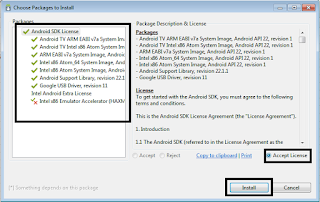
Step 3 : Click Install by accepting License after checking all packages on the left.
all packages

Step 4 : Run the project.

Choose the device and click Box besides Device. Do not click OK.
choose emulator

Step 5 : Choose Nexus5 API  OR Nexus One and click Edit (pencil shaped icon).
edit device

Step 6 : Give a name to your emulator. Go to Advanced Settings.
name emulator

Step 7 : Choose Appropriate RAM and Internal Memory,External Memory,and check on Keyboard Input. Then click Finish.
avd
 Now run the application with your newly defined emulator.

Stay Tuned with Made In Android
Published By:
Unknown
on 14.5.15

8 May 2015

Installing Android Studio on Windows

What is Android Studio ?
-> Android studio is a platform used to develop android applications. Previously, Eclipse with ADT was used to develop android apps, but google has now developed its own framework. Since there is a shift from Android v2 to Android v4 onwards, Android Studio is available to develop apps for Mobile phones having Android v4 onwards.

Steps to Install Android Studio on Windows OS :

Step 1 : Go to
 http://developer.android.com/sdk/index.html
and download Android Studio by clicking on Download Android Studio button.
download android studio
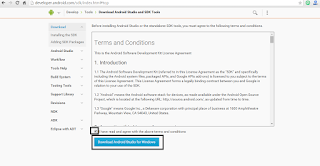
Step 2 : Accept the license agreement and click download
download link android studio
Step 3 : The .exe file will be downloaded. Click on it and setup will be started. Click on Next.
setup as

Step 4 : Check all the options as shown below and click Next.
setup 2

Step 5 : Click on I Agree
i agree

Step 6 : Choose location for Android Studio and Android SDK Installation
location sdk

Step 7 : Choose RAM allocation to start Android Studio. Use Recommended 512MB
memory need

Step 8 : Check if you want to create shortcut. Click on Install.
install 1

Step 9 : Click Finish.
finish setup

Stay Tuned with Made In Android
Published By:
Yatin Kode
on 8.5.15

8 June 2014

Make a Android Application with a simple Eclipse ? ( Part - 2 )

Continued from Part - 1
Step 1:
Download the sdk tools from here .
Scroll down the page a little bit then Click on DOWNLOAD FOR OTHER PLATFORMS .

Under the table of Sdk Tools Only click on the zip file related to your operating system .

Step 2 :
Accept the license agreement and click Download button .

Step 3 :
After you have downloaded the zip file Extract it with Winrar .
The contents in the extracted folder  for windows are shown in the below screenshot .
sdk folder

Note : For Mac book the folders in sdk folder are shown in the below screenshot .

Step 4 :
Click on SDKManager.exe for Windows for Opening SDK Manager .
OR
For Mac Book go into tools folder and click on Android for opening Android SDK and AVD Manager
sdk manager

Step 5 :
The window opened is SDK Manager (Windows) .
Note : Sort by repository
repository tick

OR
For Mac select the options Avaliable packages and double-click Android Repository and then the SDKManager will open .
android repository

Step 6 :
Choose the following options to Tick ( You can choose all of the options but it will take more time to download ) .

  1. SDK PlatformAndroid 2.2, API level 8 ,revision 2 ( under Android Repository )
  2. Google APIs, API level 8,revision 2 (  under Google Inc .....)
Note : select the same API level and revision level for  SDK PlatformAndroid and Google APIs.

And Click on Install 2 Packages .

Step 7 :
Accept license and click on Install .
accept license

Step 8 :
The downloading will start ......Restarting the ADB
Now go in the sdk folder again and click on AVDManager.exe
restart adb

OR
For Mac a prompt will occur to restart the adb click yes and then close the smaller window and then click Virtual devices shown in screenshot below .
click yes

Step 9 :
For Windows Click on New and Specify a name , Device , Target API - 8 , CPU , Keyboard , Memory etc.. of your choice .
check all
OR
For Mac in Virtual Devices click New Specify name, target , memory , API - 8 for your device and click Create AVD .
same for mac

Step 10 :
Now open your Eclipse and choose a workspace of your choice and click OK.
choose workspace

Step 11 :
Click on Window -> Preferences in Windows
Click on Eclipse -> Preferences in MacBook
eclipse preferences

Step 12 :
Choose Android in the left Panel and enter the location of sdk folder by clicking on Browse button .
Select Android 2.2 then click apply and OK .
select version

Step 12 :
Now you can make a new project by following the post previously posted
Now you are ready with Eclipse + SDK = ADT .
Follow the previous post of setting the adt part - 1 from Step 5 to make a new Android Project .

Stay tuned with Made In Android

Published By:
Yatin Kode
on 8.6.14

7 June 2014

Make an Android Application with a simple Eclipse ? (Part 1)

You can make a android app without an adt ! How
Eclipse can be binded with sdk to form adt .

Step 1 : Download Eclipse Standard version (Kepler) from Mac OS / Windows / Linux .
download eclipse

Note : Compare the bit version of your download and your machine .

Step 2 : You will Find a folder named eclipse in your Downloads folder . Copy the folder to your main HardDrive (i.e. Macintosh HD for Mac , C:/ for Windows , Home FS for Linux) .

 Open the folder and click on eclipse.exe and then select the workspace (folder to save the project) .

Step 3 : Let the eclipse open now .......

Download the adt plugin for Eclipse  by visiting here .
You will see the below page .
Copy the circled link on the page 
                    OR 
copy it from here ( https://dl-ssl.google.com/android/eclipse/ ) without brackets .
download adt

Step 4 : Open the Eclipse and cancel the Welcome page .(Click cancel icon on left corner)
Click on Help ->  Install New Software..
install new software

Step 5 : A dialog box will appear .
  1. Paste the previously copied link in the circled box 1
  2. Click Add .
  3. A dialog box will appear. Give the name to the plugin ( like : android adt) .
  4. Click OK .
add OK

Step 6 : A pending message will occur (Wait for few seconds)
Just tick Developer Tools and Click Next .(Ignore NDK tools)
developer tools

Step 7 : Check for the five libraries given below if they are present and Click Next .
  1. Android DDMS.
  2. Android Development Tools
  3. Android Hierarchy Viewer .
  4. Android Traceview .
  5. Tracer for open G LES
choose all

Step 8 : Accept the license agreement for all four options and click Next .
license aggrement

Step 9 :Let the plugins install by their own .
                         installing plugins

Next Step will be shown in the next post....Please stay Tuned with Made In Android .

Go to Part - 2 
Stay Tuned with Made In Android
Published By:
Yatin Kode
on 7.6.14

Next Page Home
Top