
Here we will learn about linking pages using buttons .
What do you require ?
--> We are going to make a button on a page . Then we are going to display a message on another page when we press the button .
Step 1 : Create to xml files in res -> layout and given them some name of your choice .Right-click on layout .Select New -> Android XML File .

Step 2 : Give a name to the xml file of your choice

Step 3 : Add a button to the xml file like I have shown in the in the previous post .Now you are ready with a button on a page like the screenshot below.
Note : Give a id to the button of your choice so that you can remember it .
 The code for the above page is shown below :
firstpage.xml
Step 4 : Now make another xml file (secondpage.xml) and display some message on it using TextView .
 The code for the above page is given below :
secondpage.xml
Step 5 : Now make java files for the above two xml files .Right-click on src. Select New->Class

Step 6 : Give a name of your choice to the classes .
Tip :

Step 7 : You may have got a class body with the specified name in the .java file you just created . Now just extend Activity class to your class .You will get an yellow bulb on the left bar .
 Click on the yellow bulb and select Import 'Activity' (android.app) . It says that you must import the package under which the Activity class is situated for using Activity class .

Step 8 : Now add the onCreate() method to the class along with the the link to the xml file of our firstpage.xml file .The name shown in black is the name of xml file .
FirstPage.java
Step 9 : Now make an instance of Button . Include Button btn1 in our class outside the onCreate method .
and don't forget to import Button package .
Step 10 : Connect the instance btn1 with the button in xml file with id button1(from xml file - green colored) . Add the below line in the onCreate() method .
The first page of the application is considered as the LAUNCHER CATEGORY
All other pages are default are not needed to be written as DEFAULT .
AndroidManifest.xml
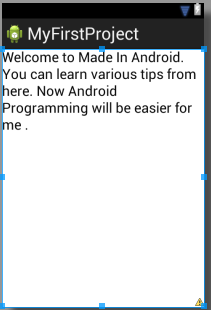
Step 14 : Run the Project .Press the green button at the top .The output will be as shown below .

 By clicking on the Next page button you will get the text shown in above screenshot .

- A xml file for displaying the button .
- Another xml file for navigating to it with the help of the button .
- A java file to build logic for the first xml file .
- Another java file for creating an instance of the second xml file.
--> We are going to make a button on a page . Then we are going to display a message on another page when we press the button .
Step 1 : Create to xml files in res -> layout and given them some name of your choice .Right-click on layout .Select New -> Android XML File .
Step 2 : Give a name to the xml file of your choice
Step 3 : Add a button to the xml file like I have shown in the in the previous post .Now you are ready with a button on a page like the screenshot below.
Note : Give a id to the button of your choice so that you can remember it .
firstpage.xml
<?xml version="1.0" encoding="utf-8"?>
<LinearLayout xmlns:android="http://schemas.android.com/apk/res/android"
    android:layout_width="match_parent"
    android:layout_height="match_parent"
    android:orientation="vertical" >
<Button
       android:id="@+id/button1"
        android:layout_width="wrap_content"
        android:layout_height="wrap_content"
        android:text="Next page" />
</LinearLayout>
The id of the button (green colored) will be required in the java file .
Step 4 : Now make another xml file (secondpage.xml) and display some message on it using TextView .
secondpage.xml
<?xml version="1.0" encoding="utf-8"?>
<LinearLayout xmlns:android="http://schemas.android.com/apk/res/android"
    android:layout_width="match_parent"
    android:layout_height="match_parent"
    android:orientation="vertical" >
<TextView
        android:id="@+id/textView1"
        android:layout_width="match_parent"
        android:layout_height="match_parent"
        android:text="Welcome to Made In Android. You can learn various tips from here. Now Android Programming will be easier for me ."
        android:textAppearance="?android:attr/textAppearanceLarge" />
</LinearLayout>
Step 5 : Now make java files for the above two xml files .Right-click on src. Select New->Class
Step 6 : Give a name of your choice to the classes .
Tip :
- Give a name related to the xml file you have created it for to avoid confusion later .
- Always start class name with Capital letter (A good practice) .
Step 7 : You may have got a class body with the specified name in the .java file you just created . Now just extend Activity class to your class .You will get an yellow bulb on the left bar .
Step 8 : Now add the onCreate() method to the class along with the the link to the xml file of our firstpage.xml file .The name shown in black is the name of xml file .
FirstPage.java
package com.example.myfirstproject;

import com.example.myfirstproject.R;

import android.app.Activity;
import android.os.Bundle;

public class FirstPage extends Activity{
        @Override
    protected void onCreate(Bundle savedinstance) {
        // TODO Auto-generated method stub
        super.onCreate(savedinstance);
        setContentView(R.layout.firstpage);
    }
}
Step 9 : Now make an instance of Button . Include Button btn1 in our class outside the onCreate method .
and don't forget to import Button package .
Button btn1;
The button declaration is shown above which is to be typed in the class body outside the onCreate() method.
Step 10 : Connect the instance btn1 with the button in xml file with id button1(from xml file - green colored) . Add the below line in the onCreate() method .
btn1 = (Button)findViewById(R.id.button1);Step11 : Type the below line of code in the onCreate() method below the line in Step 10 .
btn1.setOnClickListener(new View.OnClickListener()
You will get a method onClick() directly generated . Make an Intent in the method to perform the navigation action and pass the parameters as the calling class and the called class .
Intent choice=new Intent(FirstPage.this,SecondPage.class);
startActivity(choice);
- Create an object of Intent class of your choice (choice) .Pass parameters as the class having the button (calling class - FirstPage) and the page going to be occured after the button is pressed (called class - SecondPage) .
- Call the object by passing it as a parameter to method startActivity().
- Include a semi-colon after the round brackets .
Step 12 : Add an onCreate() method to the SecondPage class with exending it to Activity class as done earlier. Add setContent method to it and pass parameter as name of the second xml file as shown below .
SecondPage.javapackage com.example.myfirstproject;
import android.app.Activity;
import android.os.Bundle;
public class SecondPage extends Activity{
@Override
protected void onCreate(Bundle savedinstance) {
// TODO Auto-generated method stub
super.onCreate(savedinstance);
setContentView(R.layout.secondpage);
}
}
Step 13 : Open the AndroidManifest.xml File as shown in the previous post .The first page of the application is considered as the LAUNCHER CATEGORY
All other pages are default are not needed to be written as DEFAULT .
AndroidManifest.xml
<?xml version="1.0" encoding="utf-8"?>
<manifest xmlns:android="http://schemas.android.com/apk/res/android"
    package="com.example.myfirstproject"
    android:versionCode="1"
    android:versionName="1.0" >

    <uses-sdk
        android:minSdkVersion="8"
        android:targetSdkVersion="16" />

    <application
        android:allowBackup="true"
        android:icon="@drawable/ic_launcher"
        android:label="@string/app_name"
        android:theme="@style/AppTheme" >
        <activity
            android:name="com.example.myfirstproject.FirstPage"
            android:label="@string/app_name" >
            <intent-filter>
                <action android:name="android.intent.action.MAIN" />

                <category android:name="android.intent.category.LAUNCHER" />
            </intent-filter>
        </activity>

               <activity
            android:name="com.example.myfirstproject.SecondPage"
            android:label="@string/app_name" >
        </activity>
    </application>

</manifest>
The FirstPage is the name of the class related to First page and SecondPage is the name of class related to second page
Step 14 : Run the Project .Press the green button at the top .The output will be as shown below .
Stay Tuned with Made In Android


No comments:
Post a Comment